Key takeaways
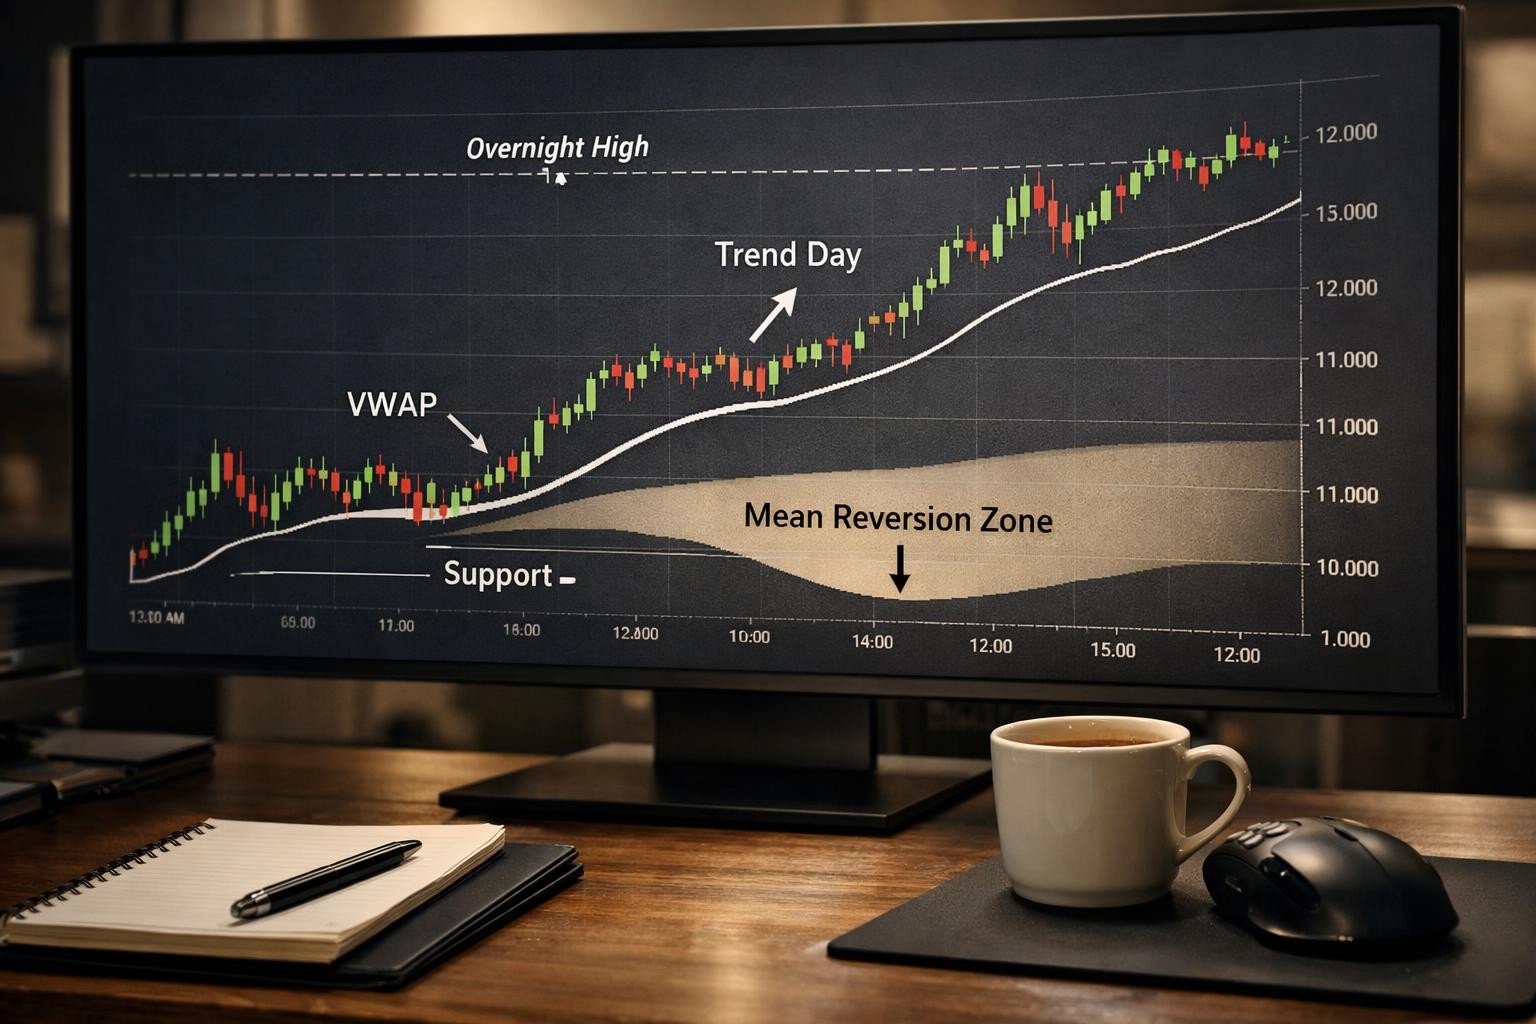
- VWAP is the session’s volume-weighted average price, which makes it a fair-value reference for the current session. It helps most when traders use it to classify context, not when they treat every touch as a signal. The real job is to define the location, trigger, and invalidation clearly enough that two disciplined traders would make roughly the same decision. One of the first numbers to define is top-down timeframe stack: Daily or 60-minute for location, 5-minute or 1-minute for execution.
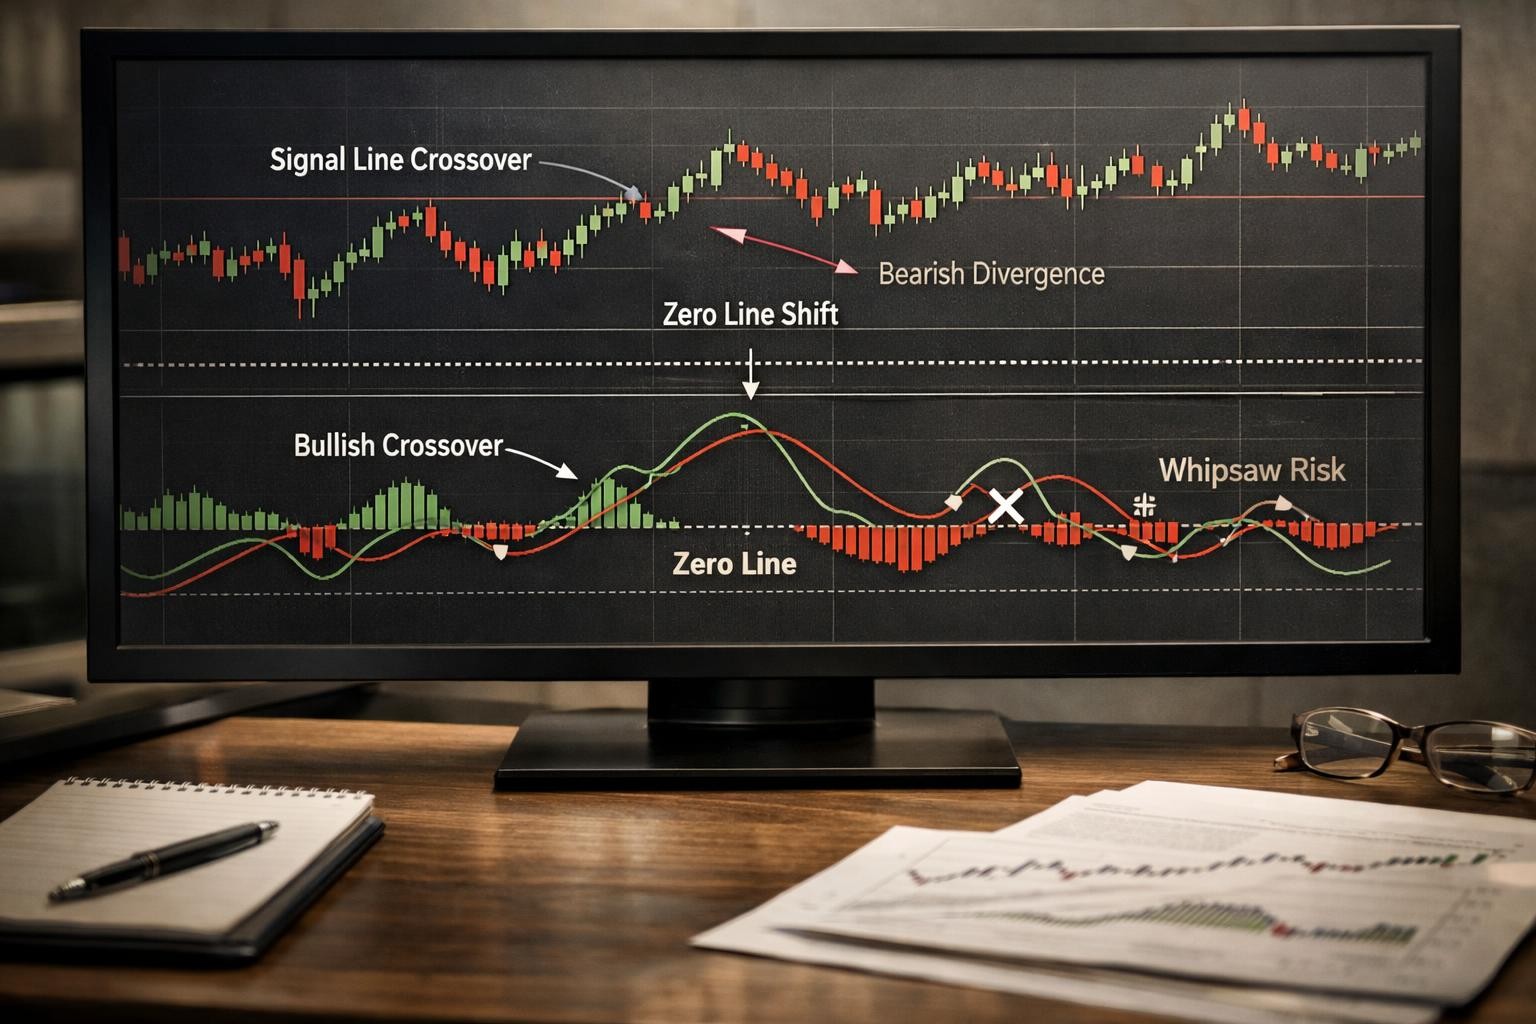
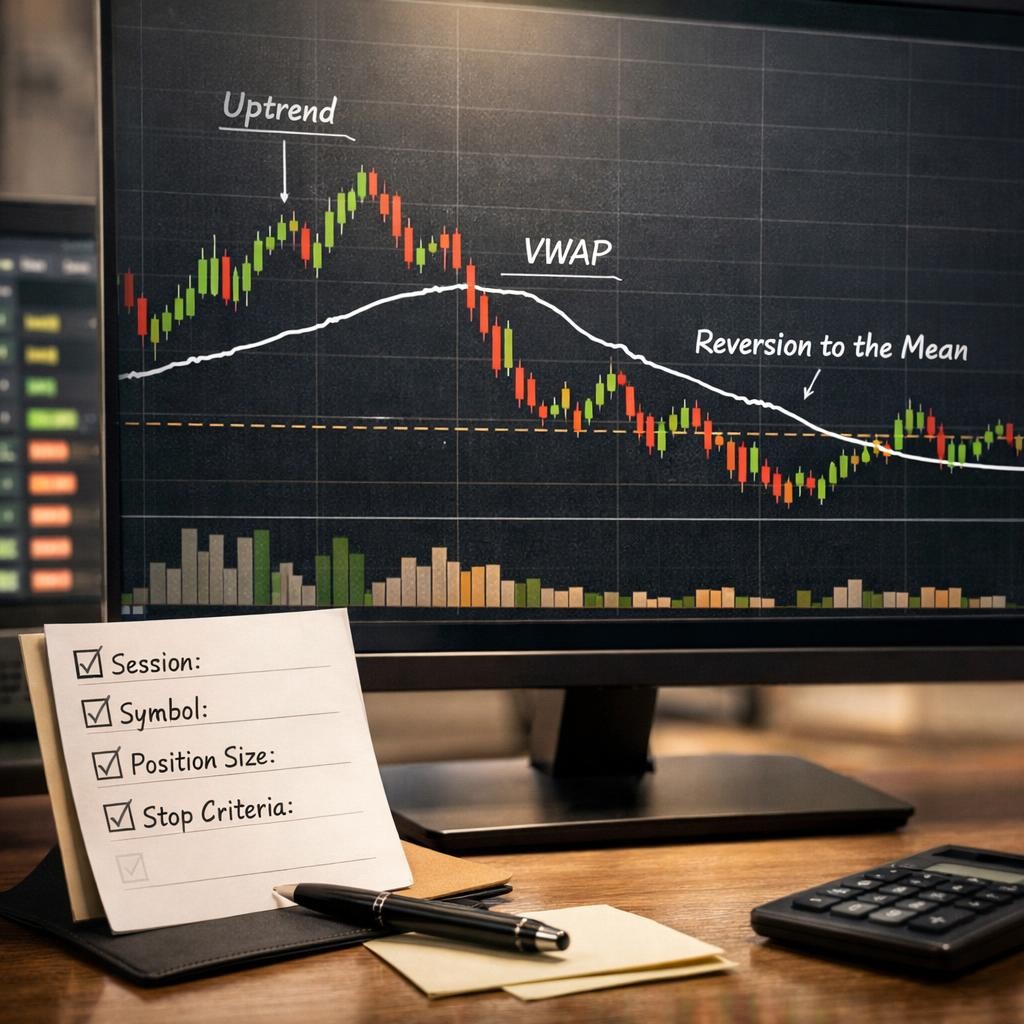
- Above VWAP can imply buyers have control on the session, below can imply sellers have control, and repeated crossings often imply balance or chop
- Top-down timeframe stack: Daily or 60-minute for location, 5-minute or 1-minute for execution.
- A common failure is buying every first touch above VWAP or selling every first touch below it without session context.
VWAP is the session’s volume-weighted average price, which makes it a fair-value reference for the current session. It helps most when traders use it to classify context, not when they treat every touch as a signal. The real job is to define the location, trigger, and invalidation clearly enough that two disciplined traders would make roughly the same decision. One of the first numbers to define is top-down timeframe stack: Daily or 60-minute for location, 5-minute or 1-minute for execution. This guide keeps the topic practical. Instead of circling the idea in broad terms, it moves through the actual decision chain: what the topic is, which rules matter, which numbers have to be defined early, how the setup is applied, what usually breaks, and how the session should be reviewed afterward.
For VWAP trading, the useful version is the one a trader can explain from the chart, the note, the sizing worksheet, or the alert payload without inventing missing context after the move.
What the setup is actually measuring
A trader should be able to point to vwap for active traders what it actually tells you what it does not and how to use it cleanly, VWAP trading, session VWAP, and fair value intraday before trusting the setup with normal size. If those nouns are not visible in the chart note, payload, sizing worksheet, or review entry, the topic is still too vague to trade cleanly.
That is what separates a topic from a label. The article has to leave the trader with something observable to verify: a level, a field, a stop distance, a review question, or a no-trade condition that can still be identified while the session is unfolding.
Use the topic to answer one blunt question before the trade: Did VWAP help identify fair value or did the trader overfit every touch? If the answer stays fuzzy, the setup has not earned risk yet.
Prerequisites and context before the trade
Before the trigger matters, the trader needs the surrounding context written clearly enough that another operator could explain why the setup is valid, weak, or inactive.
Context check 1
Above VWAP can imply buyers have control on the session, below can imply sellers have control, and repeated crossings often imply balance or chop. This should be visible before the trade, not discovered by replaying the chart later.
If this prerequisite is missing, the trade usually becomes harder to size, harder to manage, and easier to rationalize after the fact.
Context check 2
VWAP is stronger as context than as a standalone trigger. If the trader cannot point to this condition before entry, the setup is still too loose to trust.
When this prerequisite is skipped, weak entries often look acceptable right up until the review exposes the missing context.
Context check 3
A trend day often uses VWAP as a pullback reference; a balanced day often whips through it. Treat this like a written prerequisite, not a feeling that gets filled in after the move.
Missing this prerequisite usually shows up later as late entries, wider stops, or a note that cannot explain why the trade was valid.
Context check 4
Anchored or session VWAP needs to match the question being asked; traders should know which reference they are using and why. This belongs in the plan before the session opens so the trade can be filtered quickly under pressure.
A missing prerequisite here usually means the trader is relying on memory or optimism instead of a rule that can survive speed.
The decision rules that separate clean reads from noise
These are the rules that should change the trade or the no-trade decision before execution begins.
If a rule does not change size, timing, routing, or the decision to stay flat, it is not doing much work. Good decision rules narrow the workflow before volatility speeds up and before the trader starts negotiating with the setup in real time.
Rule 1: Above VWAP can imply buyers have control on the session, below can imply sellers have control, and repeated crossings often imply balance or chop
If above VWAP can imply buyers have control on the session, below can imply sellers have control, and repeated crossings often imply balance or chop, classify the session first: trend, balance, or event-driven expansion.
Why it matters: Higher timeframes define location; lower timeframes refine entry, stop placement, and timing
If the rule cannot be checked quickly in the live workflow, tighten it until the decision is obvious from the note, chart, or payload.
Rule 2: VWAP is stronger as context than as a standalone trigger
If vWAP is stronger as context than as a standalone trigger, use VWAP to ask whether price is trading in acceptance away from value or reverting back toward it.
Why it matters: Fast spikes matter less than whether price can hold the new area long enough to change the auction
A strong rule is one the operator can verify in seconds without inventing missing context.
Rule 3: A trend day often uses VWAP as a pullback reference; a balanced day often whips through it
If a trend day often uses VWAP as a pullback reference; a balanced day often whips through it, pair VWAP with structure and pace; a touch alone is not enough if the session is rotating and liquidity is thin.
Why it matters: The stop distance has to reflect the product and volatility, but the invalidation must still sit where the read is wrong, not where the trade size looks prettier
If the rule still needs interpretation under pressure, the workflow is not ready for normal size.
Rule 4: Anchored or session VWAP needs to match the question being asked; traders should know which reference they are using and why
If anchored or session VWAP needs to match the question being asked; traders should know which reference they are using and why, classify the session first: trend, balance, or event-driven expansion.
Why it matters: VWAP is more useful as a session-state classifier than as a blind signal line
Use the rule to narrow the action set before the market accelerates, not to explain the trade afterward.

Key parameters and ranges to define before the session
Strong trading tutorials surface the numbers early. They make the trader define the range, threshold, or constraint before the trigger gets attention.
Table 1: Working ranges and thresholds
| Item | Working range | Why it matters |
|---|---|---|
| Top-down timeframe stack | Daily or 60-minute for location, 5-minute or 1-minute for execution | Higher timeframes define location; lower timeframes refine entry, stop placement, and timing. |
| Example confirmation window | 2 closes or 5 to 15 minutes of acceptance beyond a key level | Fast spikes matter less than whether price can hold the new area long enough to change the auction. |
| Example intraday invalidation distance | 4 to 8 ES points or 16 to 32 ticks beyond the reference | The stop distance has to reflect the product and volatility, but the invalidation must still sit where the read is wrong, not where the trade size looks prettier. |
| VWAP session classification | Trend day holds above or below VWAP; balance day crosses it repeatedly | VWAP is more useful as a session-state classifier than as a blind signal line. |
These numbers should be written before the trade so they can shape the decision while the market is still moving, not after the fact. Read the item column first, then use working range to decide whether the setup still deserves risk, needs smaller size, or should be skipped outright.
Step-by-step implementation
Use the topic in this order so the decision stays clear before the market starts moving too fast to improvise cleanly.
Step 1: Classify the session first: trend, balance, or event-driven expansion
Classify the session first: trend, balance, or event-driven expansion. This step should remove one source of ambiguity before the trade is active.
Rule to verify here: Above VWAP can imply buyers have control on the session, below can imply sellers have control, and repeated crossings often imply balance or chop. If that is not true, classify the session first: trend, balance, or event-driven expansion.
Useful range or threshold: Top-down timeframe stack -> Daily or 60-minute for location, 5-minute or 1-minute for execution. Higher timeframes define location; lower timeframes refine entry, stop placement, and timing.
Write down what would cancel this step before the trade goes live so the review can later confirm whether the gate was respected.
Step 2: Use VWAP to ask whether price is trading in acceptance away from value or reverting back toward it
Use VWAP to ask whether price is trading in acceptance away from value or reverting back toward it. Do not move on until the evidence for this step is visible in the chart, note, or payload.
Rule to verify here: VWAP is stronger as context than as a standalone trigger. If that is not true, use VWAP to ask whether price is trading in acceptance away from value or reverting back toward it.
Useful range or threshold: Example confirmation window -> 2 closes or 5 to 15 minutes of acceptance beyond a key level. Fast spikes matter less than whether price can hold the new area long enough to change the auction.
Note the condition that would invalidate this step so the trader is not negotiating with it mid-trade.
Step 3: Pair VWAP with structure and pace; a touch alone is not enough if the session is rotating and liquidity is thin
Pair VWAP with structure and pace; a touch alone is not enough if the session is rotating and liquidity is thin. If this part stays fuzzy, the trade usually becomes harder to review honestly later.
Rule to verify here: A trend day often uses VWAP as a pullback reference; a balanced day often whips through it. If that is not true, pair VWAP with structure and pace; a touch alone is not enough if the session is rotating and liquidity is thin.
Useful range or threshold: Example intraday invalidation distance -> 4 to 8 ES points or 16 to 32 ticks beyond the reference. The stop distance has to reflect the product and volatility, but the invalidation must still sit where the read is wrong, not where the trade size looks prettier.
If the evidence for this step disappears, the workflow should have a documented fallback instead of a guess.
What the setup looks like in a live session
The point of a live walkthrough is to show the order of decisions while the information is still incomplete. That is what separates a practical trading article from a post-trade narrative.
Session moment 1
A trader identifies an opening drive higher and notices price holding above VWAP on shallow pullbacks. At this point the trader should be able to name the location, the condition that still makes the setup valid, and the line that would cancel it.
The useful question here is simple: Did VWAP help identify fair value or did the trader overfit every touch? If the answer is still vague during the session, the trader usually needs to reduce size, wait for better evidence, or stay flat.
At this stage the operator should still be able to name the trigger, the invalidation, and the fallback response without opening a second chain of reasoning. If that answer needs storytelling, the workflow has already drifted away from the written plan.
Session moment 2
Rather than chase the high, the trader waits for a pullback that holds above VWAP and confirms with continued acceptance. At this stage the trade should still have a clear reason to exist, a clear reason to stay inactive, and a clear reason to be abandoned if the read deteriorates.
The useful question here is simple: Was the session type compatible with a VWAP-based trade? A fuzzy answer here is usually a sign that the setup should be downgraded, delayed, or ignored instead of forced.
The step is only useful if the trader can explain what would cancel the idea immediately, what would downgrade size, and what evidence would keep the plan intact under pressure.
Session moment 3
If price starts crossing VWAP repeatedly and losing trend shape, the trader stops treating it like a trend continuation day. This is the moment where the trader has to decide whether the evidence is improving the setup or simply making the chart busier.
The useful question here is simple: Did the trader treat VWAP as context or as a standalone signal? If this question cannot be answered in real time, the workflow has probably moved faster than the written process can support.
This is also where the written process proves whether it is operational or decorative. If the trader cannot point to the exact field, level, or rule that controls the next action, the setup is still too loose.
Key parameters table
The chart gets cleaner when the trader decides ahead of time which references, confirmation rules, and invalidation distances matter. Parameter tables are useful because they reduce improvisation.
Table 1: Market-structure parameters to predefine
| Parameter | Example value | Why it matters |
|---|---|---|
| Primary reference | Prior value high | Gives a location that can attract or reject price |
| Confirmation rule | Two 5-minute closes above the level | Separates acceptance from a one-bar spike |
| Execution timeframe | 1-minute to 5-minute chart | Keeps lower timeframe work focused on entry and risk only |
| Invalidation distance | 4 to 8 ES points | Defines where the read is clearly wrong |
Writing parameters down before the open reduces hindsight-driven chart interpretation. Read the parameter column first, then use example value to decide whether the setup still deserves risk, needs smaller size, or should be skipped outright.
Table 2: VWAP operating table
| Session state | VWAP behavior | Trader response |
|---|---|---|
| Trend day | Price pulls back and holds one side of VWAP | Use VWAP as pullback context, not a blind entry |
| Balanced day | Price crosses VWAP repeatedly | Treat VWAP as fair-value magnet, not trend confirmation |
| Late-session chase | Price extends far from VWAP after large move | Demand better location or stay flat |
The usefulness of VWAP depends on the day type more than on the line itself. Read the session state column first, then use vwap behavior to decide whether the setup still deserves risk, needs smaller size, or should be skipped outright.
Scenario walkthrough: reading the setup in context
A good chart tutorial explains the order of decisions instead of showing the finished markup only after the move. The walkthrough below keeps VWAP trading tied to location, confirmation, and risk.
Worked example 1: Intraday ES structure example
ES opens near prior value high after printing a 22-point overnight range, then tests the level twice in the first 30 minutes.
- Mark prior day high, prior day low, overnight high, overnight low, and the nearest balance edge before the open.
- Wait to see whether price accepts above value high for at least two 5-minute closes or rotates back inside the prior range.
- If the market holds the new area, use the lower timeframe to enter on a shallow pullback; if it fails back into value, treat the first breakout as noisy movement, not initiative control.
- Place invalidation beyond the level where acceptance would clearly be disproved, then compare the remaining distance to the next meaningful structural target.
The important part of this example is the decision chain. The decision should come from acceptance at location, not from raw speed or the first burst through a level.
A strong worked example should still be useful when the next chart looks different. The trader should be able to reuse the same sequence of checks, thresholds, and adjustments without needing the exact same screenshot to justify the decision.
That usually means the example leaves behind something reusable: a formula, a field check, an invalidation distance, a size adjustment, or a review prompt that can be copied into the next session plan with only the numbers changed.
Invalidation framework: when the read is wrong
A market read becomes useful only when the trader knows what price behavior or time-based response would prove the idea wrong. These anchors turn that into something the desk can review.
Metric 1: Top-down timeframe stack
Top-down timeframe stack matters because Higher timeframes define location; lower timeframes refine entry, stop placement, and timing.
- Working number: Daily or 60-minute for location, 5-minute or 1-minute for execution
- Why it changes the decision: Higher timeframes define location; lower timeframes refine entry, stop placement, and timing.
- How to use it: Translate top-down timeframe stack into the setup, the size, or the skip decision before the trade is live.
Write top-down timeframe stack into the plan before the session starts so the number can be checked without improvising.
Metric 2: Example confirmation window
Example confirmation window matters because Fast spikes matter less than whether price can hold the new area long enough to change the auction.
- Working number: 2 closes or 5 to 15 minutes of acceptance beyond a key level
- Why it changes the decision: Fast spikes matter less than whether price can hold the new area long enough to change the auction.
- How to use it: Translate example confirmation window into the setup, the size, or the skip decision before the trade is live.
If example confirmation window changes during the session, the trader should know exactly whether that means smaller size, slower timing, or no trade.
Metric 3: Example intraday invalidation distance
Example intraday invalidation distance matters because The stop distance has to reflect the product and volatility, but the invalidation must still sit where the read is wrong, not where the trade size looks prettier.
- Working number: 4 to 8 ES points or 16 to 32 ticks beyond the reference
- Why it changes the decision: The stop distance has to reflect the product and volatility, but the invalidation must still sit where the read is wrong, not where the trade size looks prettier.
- How to use it: Translate example intraday invalidation distance into the setup, the size, or the skip decision before the trade is live.
A useful metric becomes part of the review when the trader can compare the planned example intraday invalidation distance with what actually happened live.
Metric 4: VWAP session classification
VWAP session classification matters because VWAP is more useful as a session-state classifier than as a blind signal line.
- Working number: Trend day holds above or below VWAP; balance day crosses it repeatedly
- Why it changes the decision: VWAP is more useful as a session-state classifier than as a blind signal line.
- How to use it: Translate vwap session classification into the setup, the size, or the skip decision before the trade is live.
The number should survive pressure because it already tells the desk what a valid, weak, or broken version of the setup looks like.
Troubleshooting and failure modes
This is where the topic usually breaks in real trading: not because the trader never heard the idea, but because the implementation drifted away from the rule.
Symptom 1: Buying every first touch above VWAP or selling every first touch below it without session context
Likely cause: Above VWAP can imply buyers have control on the session, below can imply sellers have control, and repeated crossings often imply balance or chop
Fix: Classify the session first: trend, balance, or event-driven expansion
Correct the workflow before the next trade instead of writing a cleaner excuse for the last one.
Symptom 2: Ignoring whether the day is balanced and simply rotating around VWAP
Likely cause: VWAP is stronger as context than as a standalone trigger
Fix: Use VWAP to ask whether price is trading in acceptance away from value or reverting back toward it
The fix only counts if the next simulation proves the workflow changed in a measurable way.
Symptom 3: Using VWAP as the only reason for a trade without confirming location or invalidation
Likely cause: A trend day often uses VWAP as a pullback reference; a balanced day often whips through it
Fix: Pair VWAP with structure and pace; a touch alone is not enough if the session is rotating and liquidity is thin
A troubleshooting note should end with a changed rule, not with a more flattering explanation.
When the topic should stay inactive
A strong guide should also tell the trader when the setup does not deserve capital. That is where the written rule often protects more money than the entry pattern itself.
No-trade filter 1
Buying every first touch above VWAP or selling every first touch below it without session context. If that condition is already visible before the order is sent, the cleaner decision is usually to pass, reduce size, or wait for a better version of the setup.
This filter matters most on the days when the trader is tempted to force the setup because the session is active but not actually clean.
A no-trade filter is part of the edge because it protects the conditions that make the next clean setup worth trading. If the filter is already broken before entry, the account usually benefits more from preserved capacity than from another forced attempt.
No-trade filter 2
Ignoring whether the day is balanced and simply rotating around VWAP. When that condition is already obvious, the setup is usually stronger as a no-trade decision than as a forced entry.
Most avoidable damage starts here, when a trader knows the condition is weak but still wants the label to count as permission.
This is where discipline protects future opportunity. Passing on a broken setup keeps capital, attention, and rule integrity available for the next trade that actually deserves them.
No-trade filter 3
Using VWAP as the only reason for a trade without confirming location or invalidation. If this is already on the screen before the order is sent, staying flat usually protects more edge than arguing with the label.
The test is not whether the setup can be defended afterward. The test is whether it deserves capital while the evidence is still incomplete.
The practical job of this filter is to preserve decision quality. When the warning sign is already obvious before entry, protecting the account is usually the higher-value trade.
Live checklist and review framework
This section should leave the trader with a short list that can be used before the session and again after it. This is what keeps the topic actionable.
Before the trade
- Know whether the day is trend or balance before using VWAP as a reference
- Decide whether VWAP is context, trigger, or invalidation helper in this setup
- Pair VWAP with structure and reaction quality
- Do not force trades when price is simply oscillating around VWAP
- Review whether VWAP improved context or just justified mediocre entries
After the session
- Did VWAP help identify fair value or did the trader overfit every touch
- Was the session type compatible with a VWAP-based trade
- Did the trader treat VWAP as context or as a standalone signal
If the answers stay vague, the next revision should simplify the rule instead of adding another exception.
A good checklist section should shorten tomorrow’s decision, not just summarize today’s. The output of this review is usually one cleaner trigger, one clearer filter, or one narrower risk rule that makes the next live session easier to execute honestly.
That is also how the article becomes practical over time. The trader should be able to reuse the same before-trade checklist and after-session questions across multiple market conditions without rewriting the standard from scratch every time.
Bottom line
VWAP for active traders: what it actually tells you, what it does not, and how to use it cleanly should give the trader a better live decision, not a better post-trade explanation. The durable version of this topic is the one that survives the note, the chart, the sizing rule, and the review without needing hindsight to make it look coherent.
If you remember only one thing, make it this: Above VWAP can imply buyers have control on the session, below can imply sellers have control, and repeated crossings often imply balance or chop Then check Top-down timeframe stack before sending risk. That combination usually does more to improve results than adding more opinions or more indicators.
The practical edge comes from documenting the workflow clearly enough that the next session starts with fewer assumptions, fewer avoidable mistakes, and a much cleaner answer to the question of whether the setup deserves risk at all.
That is the real standard for VWAP trading: the article should leave behind a rule the trader can execute, audit, and improve under pressure. If the write-up cannot survive a live checklist, a sizing worksheet, or a routing log, the idea is still too soft for capital.
The version worth keeping is usually not the most complicated one. It is the one that helps the trader make the next real-time decision faster, with fewer assumptions, clearer failure points, and a better reason either to take the trade properly or to stay out of it completely.
If the article did its job, the trader should be able to carry one or two lines from it straight into the next plan: the condition that proves the setup, the condition that cancels it, and the response that protects capital when the read weakens. That is the difference between helpful trading guidance and content that only sounds disciplined.
Frequently asked questions
What does VWAP actually measure?
VWAP measures the average traded price for a session weighted by volume, which makes it a useful fair-value reference for that session.
Why does VWAP fail so often for new traders?
Because they trade the line without first classifying the session. VWAP behaves very differently in a trend day than in a balanced day.
Is VWAP a standalone strategy?
Usually no. It becomes more useful when combined with structure, pace, location, and a clear invalidation rule.
Newer
Reward-risk ratio for traders: why clean R-multiples still fail without context and execution discipline
Older